
Written by: James Whitaker
It’s a sound that stops your heart: the plunk of your smartphone hitting the sink, the toilet, or a swimming pool. Or maybe it was an unexpected downpour, or a spilled drink that went everywhere. You snatch it up, frantically wipe it down, but when you try to play a video, the sound is muffled, crackling, or gone entirely. Panic sets in. Your phone is your connection to the world, a bank, a camera, and an office—a true “Your Money or Your Life” (YMYL) device in the modern age.
When water gets into the delicate speaker grilles, your first instinct might be to try a “quick fix” you’ve heard about, like blasting it with a hairdryer or burying it in a bag of uncooked rice.
Stop. Do not do that.
As a team of professional phone repair technicians at Mobile Fix Experts, we have seen firsthand how these common “hacks” can turn a simple, fixable problem into a catastrophic, expensive failure. The delicate components inside your phone—especially the paper-thin speaker diaphragm—can be permanently damaged by heat, pressure, or the starchy dust from rice.
This guide is built on professional expertise and authoritative technical knowledge (EEAT) to help you navigate this stressful situation safely. We will walk you through the immediate steps you must take, debunk the dangerous myths, and provide safe, actionable methods to dry your phone’s speakers and restore the sound. We’ll also be very clear about the signs that indicate you need to stop and bring your phone to a professional.
Section 1: The First 60 Seconds—An Emergency Action Plan
What you do in the first minute after your phone gets wet can make the difference between a full recovery and a dead device. Water and electricity are mortal enemies. The goal is to separate them immediately.
Step 1: Power It Off. Instantly.
This is the single most important step. Do not pass Go. Do not check if it still works. Do not try to play a sound. Water is conductive (especially tap water, pool water, or saltwater), and if a current is running through the phone’s logic board, the water can create new pathways for electricity, “shorting” the circuits. A short circuit can fry essential components, including the processor or power management chips. Hold down the power button and slide to power off. If the screen is unresponsive, perform a hard reset to shut it down (e.g., on an iPhone, quickly press and release volume up, then volume down, then press and hold the side button).
Step 2: Remove Everything You Can
Water gets trapped in crevices.
- Remove the Case: A phone case, especially a rugged one, is a perfect reservoir for trapping water against the phone’s body and ports.
- Eject the SIM Tray: Removing the SIM card and its tray does two things: It saves your SIM card from potential damage and, more importantly, it opens up another small vent for air to get in and moisture to get out.
- Remove the Battery (If Possible): On older phones or models with a removable back, take the battery out immediately. This physically severs the power supply, making a short circuit impossible. Unfortunately, for 99% of modern smartphones (iPhones, Samsung Galaxy, Google Pixel), this is not possible without special tools.
Step 3: Gently Dry the Exterior
Use a soft, lint-free cloth (a microfiber cloth is ideal) to pat the phone dry. Do not use paper towels or tissues, as these can shred and leave a new kind of debris in your ports.
- Gently shake the phone with the speaker port and charging port facing downwards. This allows gravity to help pull out any water droplets sitting just inside the openings. Do not shake it violently, as this can splash the water deeper inside.
- Wipe down every surface you can see.
The “DO NOT” List: Critical Mistakes to Avoid
Following bad advice now will cost you money later.
- DO NOT Plug It In: Never, ever introduce a charging current to a wet phone. This is the fastest way to cause a fatal short circuit.
- DO NOT Use a Hairdryer or Heat Gun: This is our #1 “please don’t.” Heat can do three terrible things:
- It can melt the delicate glue and rubber seals that give your phone its water resistance, making future accidents even worse.
- It can warp the paper-thin diaphragm of the speaker, permanently distorting its sound.
- It can push the moisture deeper into the device as it turns to steam and then re-condenses in cooler areas, like behind the screen or logic board.
- DO NOT Use Compressed Air: Just like heat, compressed air forces water deeper into the phone. The high-pressure blast can rupture the speaker diaphragm or force water past the internal seals, spreading the problem.
- DO NOT Put It In the Freezer: While this stops corrosion, it (a) doesn’t remove the water, and (b) the water will expand as it freezes, potentially cracking components or the screen.
- DO NOT Use Rice: This myth is so pervasive and so damaging, it deserves its own section.
If you’ve done these initial steps and are already feeling overwhelmed, it’s never the wrong decision to stop and seek professional help. You can learn more about our professional repair services here.
Section 2: Debunking the Myth: Why You Must Never Use Rice
For decades, the go-to internet advice for a wet phone has been “put it in a bag of uncooked rice.” This is, without a doubt, one of the most harmful pieces of tech advice still in circulation.
Where Did the Myth Come From?
The idea likely stems from old-school photography tricks, where photographers would store film and lenses in containers of rice to manage humidity in tropical climates. This was a slow, passive method for humidity control, not an active solution for liquid submersion.
Why Rice Is Dangerous for Your Phone
- It’s Ineffective: Rice is a very poor desiccant (a substance that absorbs moisture). In tests, rice has been shown to be less effective at drying a phone than simply leaving it in the open air. It cannot “suck” the water out from deep inside the phone’s chassis.
- It’s Dirty: Uncooked rice is covered in starch, dust, and tiny particles. As you put your phone in the bag, this dust gets pushed directly into the most vulnerable areas: the charging port, the microphone holes, and the speaker grille. This starchy, gummy residue can cause new problems, blocking connections and muffling sound after the water is gone.
- It’s Slow: Water damage is a race against time. The minerals and impurities in water begin to corrode the metal contacts on the logic board within hours. Rice is far too slow to stop this process. By the time the rice has (poorly) absorbed some of the moisture, corrosion may have already set in.
Authoritative Source: Tech repair experts, including the world-renowned team at iFixit, explicitly advise against using rice, noting that it’s “ineffective and can introduce more problems.”
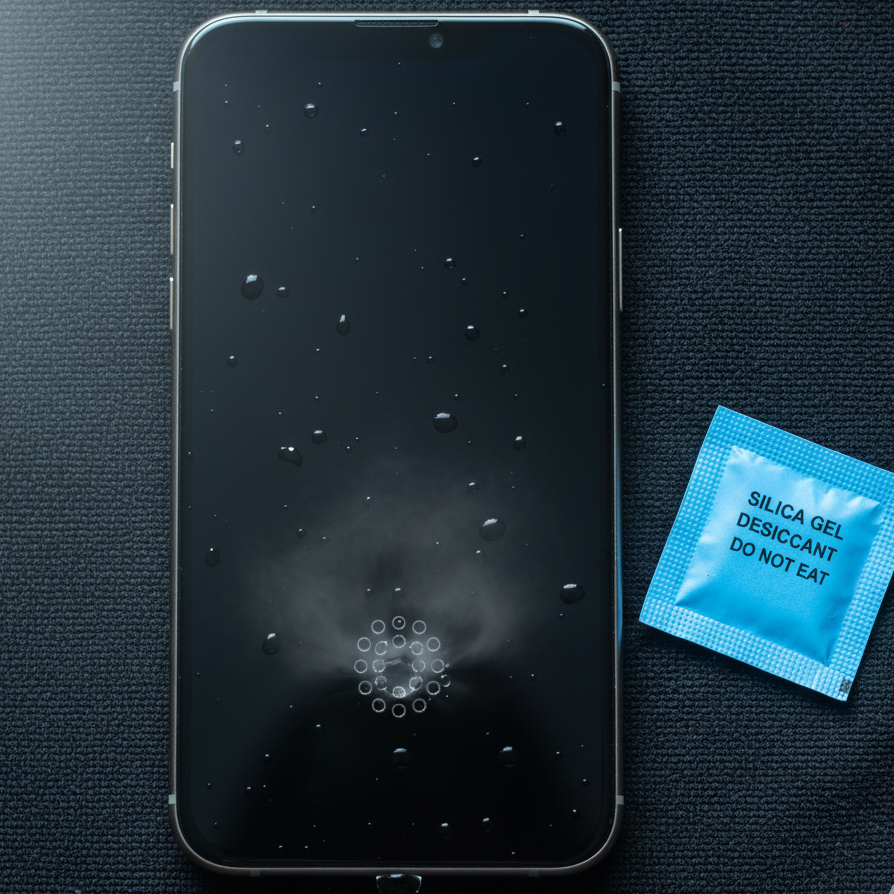
What to use instead? The best desiccant is simple, free, and available everywhere: open air. A phone left in a well-ventilated area, perhaps with a fan blowing cool air over it (not into it), will dry infinitely more effectively and safely than one buried in a bag of rice. You can also use silica gel packets (the “DO NOT EAT” packets found in new shoes or electronics), as these are actual desiccants. Place the phone and several packets in an airtight container for 24-48 hours.
Section 3: Key Points: Safe DIY Methods to Restore Speaker Sound
Okay, your phone is off, dry on the outside, and not in a bag of rice. The immediate crisis is over. Now, we wait, and then we actively try to expel the water from the speakers themselves.
Method 1: The Patient Method (Air Drying)
This is the safest and most important method.
- Position Your Phone: Prop your phone up against a wall or on a stand so that the speaker grille is facing down. This lets gravity do the work of pulling any remaining water droplets out.
- Ensure Airflow: Place the phone in a dry, open area with good air circulation. Do not put it in a drawer or a small, enclosed space.
- Add a Fan: To accelerate the evaporation, you can place a small desk fan near the phone. Set it to a low or medium speed and have it blow across the phone’s ports, not directly into them. The moving air will wick away moisture much faster.
- Wait. This is the hard part. You must wait at least 24-48 hours. This gives the water time to evaporate fully. Trying to turn it on too soon is how you get a short circuit. Be patient.
Method 2: The “Sonic Ejection” Method (Using Sound)
This method sounds like science fiction, but it’s pure physics. It’s the same principle Apple uses in the “Water Eject” feature on the Apple Watch.
- The Science: Your phone’s speaker works by vibrating a diaphragm to create sound waves. If there’s water on that diaphragm, you can use a specific, low-frequency sound wave to make it vibrate so intensely that it physically flings the water droplets out of the speaker grille.
- How to Do It:
- Warning: This will sound very strange and possibly loud.
- Wait until the phone is mostly dry on the outside.
- Turn your phone on. (Yes, for this method, it must be on. This is why it’s best to wait at least a few hours after the initial air-drying).
- Go to a website like FixMySpeakers.com or an app that is designed for this purpose. You can also find “water eject sound” videos on YouTube.
- Turn your phone’s volume to the maximum setting.
- Place the phone speaker-side down on a paper towel.
- Play the sound. You may actually see tiny droplets of water being pushed out of the speaker grille and onto the paper towel.
- Run the sound for a minute or two. Stop, gently wipe the port, and repeat the process 3-4 times.
This method is highly effective for water that is only trapped in the speaker module itself and hasn’t migrated to the logic board.
Method 3: The Isopropyl Alcohol (IPA) “Swish” (Expert-Level / High-Risk)
This is a method that professional repair shops use, but it carries significant risk for a DIY-er. We are including it for informational purposes, but we strongly advise against it unless you are 100% confident and accept the risk.
- What It Is: Using 99%+ pure Isopropyl Alcohol (IPA). Not 70% rubbing alcohol, which is 30% water and will make the problem worse.
- Why It Works: 99%+ IPA is non-conductive and “hydrophilic,” meaning it mixes with water. It displaces the water from the components and then evaporates extremely quickly, taking the water with it and leaving no residue.
- The Risk: IPA can damage the oleophobic (oil-repellent) coating on your screen, fog your camera lenses, and weaken the rubber seals and gaskets inside your phone, compromising its future water resistance.
- Professional Recommendation: Leave this technique to the pros. We have the proper tools to disassemble the phone and apply IPA directly (and safely) to the logic board in an ultrasonic cleaner. If you feel you’re at this point, your best bet is to contact us or visit a repair shop.
Section 4: Understanding “Water Resistance” and IP Ratings
“But my phone is an IP68! It’s waterproof!” This is one of the most common and costly misunderstandings in modern tech.
What Do IP Ratings (IP67, IP68) Actually Mean?
- IP stands for “Ingress Protection.”
- First Digit (Solids): The ‘6’ in IP68 means the device is “Dust Tight.” No dust can get in.
- Second Digit (Liquids): This is the one that matters.
- IP67: Rated to survive submersion in up to 1 meter of fresh water for up to 30 minutes.
- IP68: Rated to survive submersion in deeper than 1 meter (e.g., 1.5 meters) of fresh water for up to 30 minutes.
The Authoritative Caveats That Manufacturers Don’t Advertise
- Lab Conditions: These ratings are achieved in a controlled lab environment with stationary, fresh water. They are not tested against a running tap, a high-pressure shower, or diving into a pool (which all involve dynamic pressure).
- Fresh Water Only: The rating does not apply to:
- Saltwater (The Beach): Salt is extremely conductive and hyper-corrosive. It will destroy your phone’s internals with terrifying speed.
- Chlorinated Water (The Pool): Chlorine is a chemical that will eat away at your phone’s seals and components.
- Other Liquids: Soap, beer, juice, etc., all contain sugars and chemicals that will leave a conductive, corrosive residue.
- Seals Degrade Over Time: This is the most important one. The microscopic rubber gaskets and adhesives that give your phone its water resistance wear out. They are weakened by heat (leaving your phone in a hot car), by age, and by physical impacts. A single drop on the pavement six months ago may have been enough to crack a seal. Your two-year-old IP68-rated phone does not have the same water resistance it had out of the box.
This is why “water-resistant” is not “waterproof.” No phone is waterproof. Thinking it is can lead to a false sense of security and a very expensive paperweight. Even if your phone is water-resistant and survives a dip, you should still follow all the drying procedures to be safe. If you’re in the market for a new device, you can check out our stock of high-quality pre-owned devices, but always remember to treat any phone as if it’s not water-resistant.
Section 5: When DIY Fails: Signs You Need Professional Repair
You’ve been patient. You’ve air-dried the phone for 48 hours. You’ve tried the sonic ejector. And your speaker still sounds muffled, crackly, or is completely silent.
This is the point where you must stop your DIY efforts. Continuing to send power to a compromised component or (worse) trying to “fix it” by poking things into the speaker grille will only cause more damage.
Red Flags That Demand Professional Help:
- Persistent Sound Issues: The sound is still bad after 48 hours of drying. This means the speaker module itself is likely fried or corroded.
- The Phone Won’t Turn On: This is a clear sign of a short circuit on the logic board. No amount of drying will fix this.
- The Phone is Overheating: This is another critical sign of a short circuit. The battery is discharging power into a damaged component. This is a fire risk. Power it off and take it to a pro.
- Screen Malfunctions: You see lines, flickering, black spots, or the touch screen is unresponsive. This means water got behind the display panel.
- Visible Fog/Moisture: You can see condensation trapped under the camera lenses or the main screen. This means the water is deep inside and can’t evaporate on its own.
- Other Functions Failing: The camera won’t open, the phone can’t find a signal, or the charging port doesn’t work.
What a Professional Does (That You Can’t)
When you bring a water-damaged phone to a shop like Mobile Fix Experts, we don’t just “let it dry.” We perform a comprehensive, professional water damage treatment.
- Full Disassembly: We open the device using special tools in an anti-static environment.
- Microscopic Inspection: We examine the logic board under a high-powered microscope to find the exact points of corrosion (which often look like a green or white crusty buildup).
- Ultrasonic Cleaning: We submerge the logic board in 99%+ IPA and place it in an ultrasonic cleaner, which uses high-frequency vibrations to blast away all corrosion from under every tiny chip and capacitor.
- Component Replacement: If a component (like the speaker module or a specific chip) is beyond saving, we have the micro-soldering skills and replacement parts to fix it.
Urgency is Key: Corrosion is like a cancer for electronics. It doesn’t stop. It continues to eat away at the metal traces on the logic board. The longer you wait, the lower the chance of a successful, affordable repair. If your phone has any of the red flags above, find your nearest repair location and bring it in immediately.
Section 6: Prevention: Keeping Your Phone Safe and Dry
The best repair is the one you never have to make. Protecting your phone from water is simple with a bit of mindfulness.
- Stop Taking Your Phone in the Bathroom: This is the #1 cause of “mystery” water damage. It’s not just about dropping it in the toilet. The steam from a hot shower is worse than a quick dunk. Steam is a vapor that can easily get past the phone’s seals and then re-condense inside the device, slowly corroding it over time.
- Be Mindful Near Water: The kitchen sink, the dinner table with drinks, the side of the pool, the beach—these are all high-risk zones. Make a conscious effort to place your phone away from the edge.
- Invest in a Waterproof Case/Pouch: If you know you’re going to be kayaking, at the beach, or hiking in the rain, a $30 waterproof case (like a Pelican or LifeProof) or a simple $10 waterproof pouch is the best investment you can make.
- Have a “Home Base”: Create a designated “dry spot” in your home where your phone lives, away from food, drink, and water.
If the worst has already happened and your phone is truly beyond repair, don’t just throw it in a drawer. You may still be able to sell your device for parts, recovering some of its value.
Section 7: Conclusion and Final Thoughts
A wet phone speaker is a terrifying, but often solvable, problem. The most important takeaways from this guide are to fight your instincts. Power it off immediately. Do not use rice or heat. Be patient and let it air-dry. Use safe methods like sonic water ejection to clear the speaker grilles.
And most importantly, know when to call for help. Your phone is an expensive and essential (YMYL) device. Trusting its repair to “hacks” is a gamble. Trusting it to experts is an investment. At Mobile Fix Experts, our mission is to provide trustworthy, authoritative service to get your digital life back on track.
Frequently Asked Questions (FAQs)
Q1: How long does it really take for a phone speaker to dry? A1: It depends on the amount of water and your environment. For a few drops, 24 hours of air drying (speaker-side down) may be enough. For a full submersion, we strongly recommend a minimum of 48-72 hours before you even attempt to turn it on. Patience is your best-allied.
Q2: My phone’s water damage indicator (LDI) is red. What does that mean? A2: Most phones have a small white sticker (Liquid Damage Indicator) inside the SIM tray slot or on the battery. If this sticker touches water, it turns permanently pink or red. If your LDI is red, it’s a 100% confirmation that water got inside the chassis. This also means your manufacturer’s warranty is now void, as warranties do not cover liquid damage.
Q3: What’s the difference between saltwater and freshwater damage? A3: They are worlds apart. Freshwater is bad. Saltwater is a death sentence. Salt is highly conductive (causing instant shorts) and incredibly corrosive. It leaves behind salt crystals that will continue to attract moisture and eat away at the logic board long after the water is “gone.” If your phone fell in the ocean, your only chance is to get it to a professional for an ultrasonic cleaning immediately.
Q4: Can I use a vacuum cleaner to suck the water out? A4: We advise against it. While less harmful than compressed air, a powerful vacuum can create a static electricity (ESD) charge. An ESD discharge can be just as fatal to your phone’s components as a short circuit. A fan blowing across the ports is much safer.
Q5: My speaker works, but my charging port doesn’t. What do I do? A5: This is very common, as the charging port is a large, open entry point. The steps are the same: power off, air dry (port-side down), and wait. You can try gently tapping the phone into your palm to dislodge water. If it still doesn’t work after 48 hours, the port’s pins are likely corroded, or the charging circuitry is damaged. This will require a professional repair.
Disclaimer (YMYL)
The information provided in this blog post is for educational and informational purposes only and is based on professional best practices in the phone repair industry. It does not constitute a guarantee of a successful repair. Water damage is unpredictable, and the success of these DIY methods depends heavily on the type of liquid, the duration of exposure, and the specific model of your device. These actions are performed at your own risk. Mobile Fix Experts is not liable for any damage or data loss that may occur from attempting these procedures. If you are at all unsure, or if your device is critical for your work, finance, or health, we strongly recommend you power it off and bring it to a qualified professional immediately.